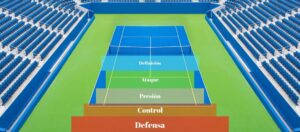


When you first enter the court, that footwork that seems so simple in the pros, becomes stumbling and discoordinated. How do players get that ease when moving? We have to imagine that the tennis court is like a dance floor: each step you take, each turn of the toe, each move with the heel or with the sole… all this does not come at random, but has a meaning and previous work which makes it later become as natural as walking for a human being. As part of all that movement, one of the footwork units on the baseline, is the Movement Cycle.
What is the Movement Cycle?
We will name as Movement Cycle all those steps that a player does from the initial split step, the movement towards the ball, loading step, hitting, recovery, and return to split step. The stances of the shot, although they make up part of this cycle, we are going to separate as a different theme. This Movement Cycle gives us the possibility of bringing together in a rhythmic unit multiple smaller components so that, in the end, we can move our feet just as the pianist moves his fingers: listening to rhythm and music. We will talk about rhythms in other articles as well since it is a unifying concept that always helps to produce a flow effect and certain sensations that players are so fixated on.

Components of the Movement Cycle
We are now going to break down the components of the Movement Circle one by one:
- Ready Position – It is position zero with which the split-step must be made. From this position, we optimize the exit possibilities in all 4 directions.
- Split Step – We also call it a Reactive Step or Reading Step, since it covers these two concepts.
- Startup Step – or the First Step. With this we managed to open the corridor of movement in the direction of the shot, arming the body with a unit turn (We will talk about unit turn separately).
- Displacement – The displacement towards the ball carries within it different components, such as running, lateral steps, different sizes of steps, etc.
- Loading and Loading Step – This last step to reach the shot has certain characteristics to slow down the inertia of the body and help balance. The quality of the loading is an important basis to later produce the shot; It will provide us with the stability and contact with the ground, necessary to generate force.
- Stroke – We will separate it from the Movement Cycle as another topic since it in itself involves extensive material to analyze.
- Recovery and Recovery Step – We will look first at the recovery step and then at the recovery offset to get back to Split.
Now we will discover these units of Movement Cycle in each of its details. We will also review the references or links that they may have with other works on the court and we will leave links in case said reference material is already published in eCoach so that you can continue with the tour.
For the readers’ knowledge, it should be noted that much of the vocabulary used in our articles come from the academy’s own methodology and may have its own meaning (variable in different languages due to the references provided by each language itself). Throughout the articles, we will also define the meanings of each concept.
Ready Position
The Ready Position is important, as it gives you the opportunity to react quickly on the ball and gives you those milliseconds that help generate the best possible shot. This position has certain important characteristics that are worth reviewing.

Ease of starting in all 4 directions
On the tennis court, you must cover a space of 360 degrees; therefore, you have to find a position that, in a well-balanced way, provides you with the ease of moving in all directions. Furthermore, this position must be linked to other previous and subsequent steps of the Movement Cycle. Since it is a complicated task, we are going to look at small details that our anatomy provides us and learn to use them to form that technical unit.
Ready Position in detail:
- The tips of the feet – have to look slightly inwards (to facilitate starting towards the sides).
- The feet – there must be a slight height difference, one more forward than the other (to facilitate starting in the vertical direction).
- Feet – apart. Comfortable leg separation depends on flexibility and open angle strength previously worked; provides balance and step span.
- Knees – flexed. When flexing, you should align your knees with your ankles to avoid unnecessary strain and consequent injuries. That unit lowers our center of gravity and brings it closer to the ground, which produces a position of balance and strength.
- Body weight – slightly forward. Don’t lift your heels too high, just lean the weight toward the front of the foot.
- Back / Axis / Head – straight, upright, inclined with weight (not bent).
- Shoulders – relaxed.
- Arms – hanging (arms-rope).
- Head – up.
With that waiting position, you will execute the Split, Reactive, or Reading Step.
Remember that this position is the ZERO point of the Movement Cycle. With this you will do the initial split step and will always return to your center to repeat the split step while your opponent hits the ball. Since it is a gesture that you are going to repeat hundreds of times in each game, you must give it importance and dedicate enough work time to it. There will be certain factors that will be personal for each player, due to their anatomy or personal preferences; for example, which foot is placed more forward, what opening or flexion they maintain… but, always within the general lines, each one will repeat the guidelines described here to be more effective when it comes to reacting.

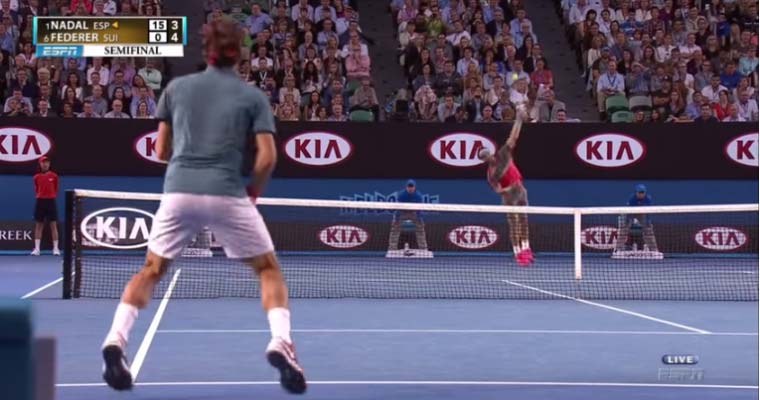
Split Step
Split Step, Reactive Step, or Reading Step is the unit that must be coordinated with the moment of the opponent’s contact with the ball. Timing with the ball is crucial to the best use of this technical unit. Inside the Split Step, there are certain varieties; the main two are:
- Basic – is used in medium-low intensity baseline rallies.
- Low – used in high-intensity rallies, once inside the court or volleying.
The Split Step technique consists of several parts:
When should you do the Split Step? – Just before the opponent hits the ball. You must coordinate with his contact point and get your movement synchronized with the ball’s coming out from his racket. This is called connecting to the ball.
Where should you do the Split? – In your center. In case you don’t have time to fully recover your center, you will do it the moment the opponent hits the ball. (See article: Your Center on the Court)
Some additional details about the Split Step:
- It’s an explosive pre-start step that makes you react faster.
- Allows quick changes of direction.
- It is a step that never stops; there is always another step that follows.
After the Split Step, Reactive, or Reading Step, you must do the Start Step. You have to learn which leg use to start the movement depending on the direction you are going. Also, remember the Ready Position to follow the details of how to prepare yourself for this step.
Start Step
This step helps you to do a unit turn in the direction you are going to run, opening the path and starting (exceptions will depend on whether the displacement steps are lateral or running). The size of the start step can vary depending on the distance you have to cover. The start on the tip or heel-sole will depend on the distance you have to cover, if you need to start or stop the inertia. Even at very short distances, you should try to carry out this step, since it helps to arm the body unit for the shot. The main rule is simple, you should come out (o open) with:
- Right leg to right.
- The left leg to the left.
Here is a video of Andre Agassi for you to take a look at his footwork:
Not only must you open with, but you must also be aware of the dominant leg in the chosen direction; therefore, think with your right leg to the right and your left leg to the left.
Start Step & Loading Step
The start step and loading are generated with the same foot. For example, if you go to the right, your start step is done with the right foot and when you load, your loading foot will be the right one as well. For this reason, in odd-numbered steps (1, 3, 5 …), the 3-step is one of the most important because it covers 90% of the strokes.
Movement
The movement towards the ball is made with lateral steps or running. It may also include some crossed lateral step, as in the diagonal offset situation, but now we will talk only about the two main types:
Displacement by running
The displacement by running towards the shot was implanted more and more in modern tennis. High speeds demanded this adaptation already at the end of the last century. At first it was used more in long-range shots, but then it was already integrated by some players in all kinds of movements. What is achieved with a displacement of this type is a higher speed to reach the ball; but it has its pros and cons, so I would recommend using it by carefully selecting the moment of development of the players and without losing sight of the side steps.

The displacement by running does not provide the same learning of feeling of rhythm and measurements of the court that the lateral steps achieve. It is a more physical movement and, during the development of young players, it can limit certain technical advances in foot movement if abused. Although it is advisable to learn this type of movement from the beginning in today’s competition players, you should not lose sight of the importance of movements on the court with lateral steps.
Displacement by lateral steps
It is a displacement typical of classic tennis. Even today’s players who prolong the development of a classic technique, such as Roger Federer for example, usually use it in its best updated versions. It creates a sense of optimal movement rhythms and court spaces, but requires a very specific development of this step (from the physical phase). In addition to implementing it in technical footwork for younger players, it should not be lost sight of in advanced players; The typical shadow exercises with rhythms of 2 or rhythms of 3 help a lot to improve the coordination and orientation of the players on court (about the shadow work, its pros and cons, we will talk in another article).
Alternate short and long steps
Alternating short and long steps depends on the distances you have to cover. At shorter distances you will use shorter steps and vice versa, long distances will require longer steps. To adjust to the ball, you will need short steps, but by the time you reach the load, the last step to reach the shot should be longer. We will see it in detail below.

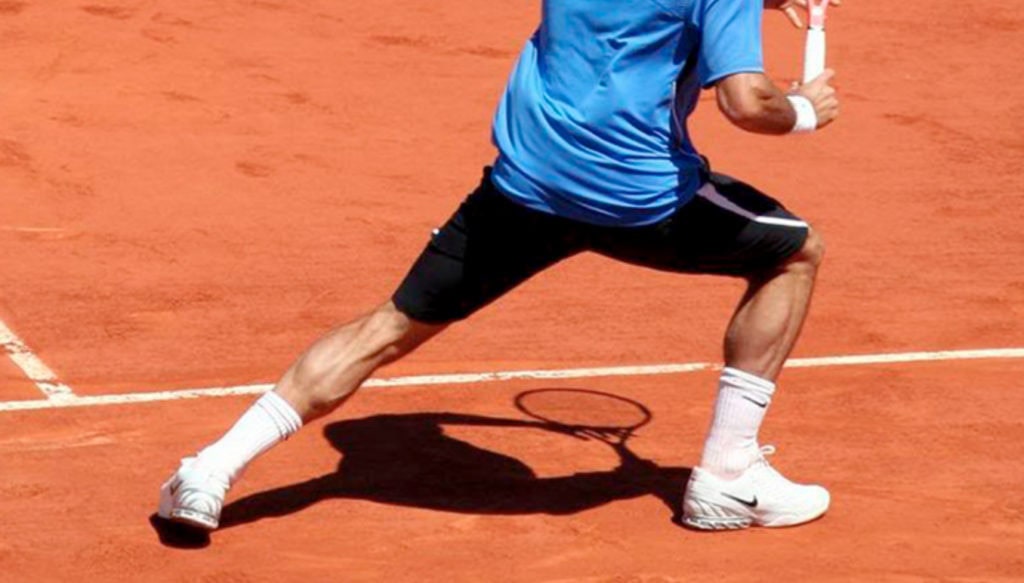
Loading Step
As the last step that takes you to the shot, the loading step is of great direct importance in the execution of the stroke. We are going to see several relevant points that we must take into account when, after the displacement, we get to the loading step:
- Choosing the Right Leg – As in the start step, selecting the correct leg is also important here. The main base is the right leg to the right and the left to the left. There are some shots that require a double transition, in which the loading is doubled; This will not mean changing the loading leg, but another support to cover certain spaces (Example: long-range backhand, second loading on the right leg, passing the weight to the left).
- The last step to reach the load has to be long – In displacement, our body picks up certain inertia that we need to brake to catch balance for the shot. So the last step must be longer. The higher the speed with which we advance towards the ball, the longer the loading step must be to stop us.
- The loading step must be made from heel to sole – To the loading, we must enter with a heel-sole sequence, on the one hand, to stop inertia and on the other to maintain greater contact with the ground, which translates into stability.
- The toe pointing parallel to baseline – looking slightly diagonally at times (to generate more forward rotation posteriorly). That way you receive the ball and load the force generators on this loading leg.
- Measure distance relative to the contact point – Loading leg measures distance to the contact point. That means, with this leg, you should calculate the distance with the ball and position yourself behind it (there will be situations in which you will not be able to do it). That is why it is important to take measurements of this step, to become aware of it and the distances and to think in displacements with this leg.
With this, we leave the loading step for the moment and we will not deepen its relationship with the execution of the shot at the biomechanical level. The only thing that I will add is that the entrance from the running will be with the unit turn already armed and the entrance from the side steps will be with the hip more in front and will require a unit turn with the loading step.
Stroke
As I said before, we are not going to delve into the variety of the shots, nor in their biomechanical concepts, but we are going to trace certain ideas. From the loading leg we can generate a wide range of stances, which we will choose depending on our situation on the court and the type of shot we want to make. We will work closely with the concepts of Court Zones and Shot Selection. Now let’s move on to the recovery steps to complete the cycle.
Recovery Steps
With the recovery steps we must take into account the proper exit from the shot. This will be very important to give us optimal options for a quick recovery. We will talk in another article about follow through and finishing the stroke, focusing here just on the recovery steps.
- The first recovery step should be lateral cross (in front). We use the crossed lateral step because with this step we cover as much space as possible and gain court; In addition to this, this being the first step, we still do not have the risk of being wrongfooted.
- The following recovery steps will be done with the normal sidesteps since we have to be alert to change direction, in which case we should do the split step.
We are going to finish this article, since it has been extended too long, pointing out that the purpose was to unify in one place all the aspects of the Movement Circle to improve its visibility. Since this unit of movement is repeated multiple times throughout the game, we should give it great importance and work it step by step. The next aspect to highlight would be the importance of adapting it to the personality of each player since this could involve slight variations.
As always you can write down doubts and questions about the Movement Cycle in the comments and I will answer you as soon as possible.
Here I leave you the video of Steffi and Aranxta with an extraordinary footwork and a historical game of Wimbledon.